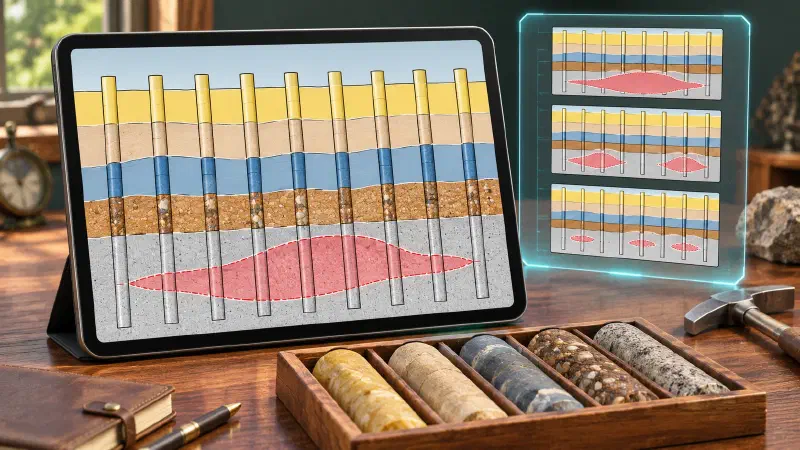
TL;DR: Want to build a cross section from drillhole data without writing code? A cross section is a vertical slice through the ground, like a cut through a layer cake. Drillholes show the rock only along each hole, so a geologist has to decide what lies between them. In the Geocluster workspace, six prompts to the built-in AI agent place nine public South Australian holes on one slice, join the layer boundaries, and draw three possible shapes for a body of broken rock called breccia. Three holes kept aside then test those shapes. The holes allow more than one answer, so the agent draws options and you choose.
What Does It Mean to Build a Cross Section From Drillhole Data?
A cross section is a vertical slice through the ground along a chosen line. To build a cross section from drillhole data, you place each hole on that slice, show its logged rock, and then draw the boundaries and rock bodies between the holes. You may also see this task written as drillhole cross section, or create geological cross section from boreholes.
The work has four parts:
- Choose a line. Pick the section line and a swath, the strip on either side where holes count.
- Project the holes. Move each nearby hole sideways onto the line.
- Show the observations. Draw each hole’s logged rock at its true elevation.
- Interpret between holes. Join the contacts and draw rock bodies, with faults, layer dip and unconformities in mind.
The key point is that the holes do not fix one answer. Different shapes can fit the same logs, so a good section shows which lines are observed and which are interpreted.
Part 1 of this series drew measured data only. The previous part matched layer boundaries between six of the holes used here. This part goes further and interprets the geometry between them.
A section can also check samples against mapped structures, which our post on cross section geology covers. Here the focus is the drillhole side.
Drillhole Data Used in This Guide
We continue with the SARIG Data Package, the South Australian government’s public export of drilling records. The holes come from the Carrapateena project area. The section uses nine holes: the six from the previous guide plus three within 100 m of the line. Three more holes are kept back to test the interpretation.
Download and Filter the SARIG Files
We cut the SARIG exports down to these holes and kept every column unchanged. To follow along, download the three full exports:
- sarig_dh_details_exp.csv (140 MB): position, elevation and depth of each hole
- sarig_dh_litho_exp.csv (402 MB): the rock intervals
- sarig_dh_strat_exp.csv (58 MB): the named unit intervals
Then keep only the rows with these DRILLHOLE_NO values:
- Section holes: 265018, 265035, 265016, 265034, 264999, 205822, 265043, 265001 and 265006. Save them as
sarig_section_details.csv,sarig_section_litho.csvandsarig_section_strat.csv. - Check holes: 265015, 265010 and 265012, from the details and lithology exports only. Save them as
sarig_check_holes_details.csvandsarig_check_holes_litho.csv, for step 5 only.
These files are large, so use a script or a tool built for large CSV files.
Source: The Department for Energy and Mining, the Government of South Australia, The SARIG Data Package, Sourced on 9 November 2026, https://dem-sdp.s3-ap-southeast-2.amazonaws.com/index.html.
Licensed under CC BY 4.0. We filtered the exports to twelve holes and derived the figures in this guide from them. The Government of South Australia does not endorse this guide.
Three things about this data shape the steps below:
- All holes are vertical. Projecting a hole onto the line moves its position but not its shape.
- Two rock logs start deep. CAR049 and CAR046 have no rock log above 390 m and 399 m, so their upper contacts come from the stratigraphic log alone.
- Three holes would overlap. CAR025, CAR017 and CAR021 sit at almost the same northing as CAR026, CAR006 and CAR008, so their columns would land on top of them. They become check holes instead.
How Do I Build a Cross Section From Drillhole Data in Geocluster?
To build a cross section from drillhole data, send six prompts one at a time in the same conversation, and wait until each one finishes. Your own judgment comes in at steps 3 and 6.
Step 1: Place the Holes on the Section Line
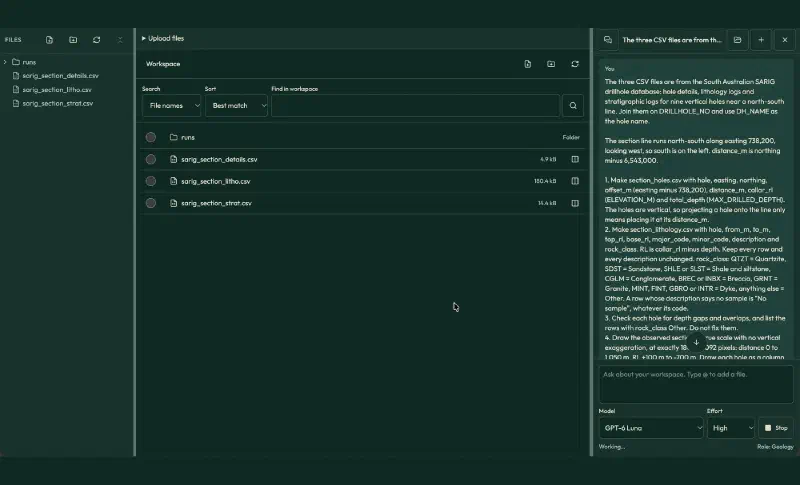
First, upload the three section files to a new Geocluster project. This prompt projects the holes onto the line and draws only what the logs record:
The three CSV files are from the South Australian SARIG drillhole database: hole details, lithology logs and stratigraphic logs for nine vertical holes near a north-south line. Join them on DRILLHOLE_NO and use DH_NAME as the hole name.

The section line runs north-south along easting 738,200, looking west, so south is on the left. distance_m is northing minus 6,543,000.

1. Make section_holes.csv with hole, easting, northing, offset_m (easting minus 738,200), distance_m, collar_rl (ELEVATION_M) and total_depth (MAX_DRILLED_DEPTH). The holes are vertical, so projecting a hole onto the line only means placing it at its distance_m.
2. Make section_lithology.csv with hole, from_m, to_m, top_rl, base_rl, major_code, minor_code, description and rock_class. RL is collar_rl minus depth. Keep every row and every description unchanged. rock_class: QTZT = Quartzite, SDST = Sandstone, SHLE or SLST = Shale and siltstone, CGLM = Conglomerate, BREC or INBX = Breccia, GRNT = Granite, MINT, FINT, GBRO or INTR = Dyke, anything else = Other. A row whose description says no sample is "No sample", whatever its code.
3. Check each hole for depth gaps and overlaps, and list the rows with rock_class Other. Do not fix them.
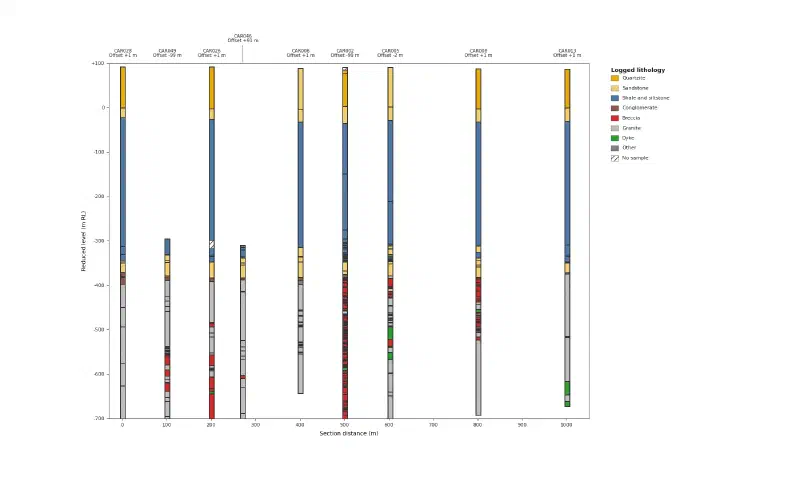
4. Draw the observed section at true scale with no vertical exaggeration, at exactly 1800 x 1092 pixels: distance -30 m to 1,050 m, RL +100 m to -700 m. Draw each hole as a column 24 m wide at its distance_m, coloured by rock_class: Quartzite #E6AB02, Sandstone #F2CF6B, Shale and siltstone #4C78A8, Conglomerate #8C564B, Breccia #D62728, Granite #BDBDBD, Dyke #2CA02C, Other #7F7F7F, No sample white with grey hatching. Depths with no lithology row stay empty with a thin outline. Label each hole above the frame with its name and offset rounded to the metre on two lines, with no labels touching, and put the legend to the right. Draw nothing between holes, name no stratigraphic unit, and add no figure title.

Save both tables as CSV and the figure as PNG.
The agent placed the nine holes and kept all 633 rock rows. We compared every row with the source files, and they all match. There are no depth gaps or overlaps. Two rows say no sample, and 11 rows with rarer codes, such as quartz vein and dolomite, fall under Other.
Red breccia appears below about RL −380 m in seven holes. It is missing from CAR028 at the south end and CAR013 at the north end. CAR006, in the middle, has only two thin breccia intervals.
Step 2: Extend the Contacts to the New Holes
A contact is the boundary between two rock units. The six holes from the previous guide already have reviewed contacts, C1 to C4. This prompt lists them and asks the agent to pick the same contacts in the three new holes:
Next, add the contacts. These depths in metres were reviewed in an earlier correlation:
C1, base of the quartzite: CAR028 92, CAR026 94, CAR006 93, CAR005 89, CAR008 90, CAR013 87.
C2, sandstone to shale: CAR028 114, CAR026 118, CAR006 121, CAR005 119, CAR008 120, CAR013 117.
C3, base of the long shale: CAR028 404.5, CAR006 403.2, CAR005 397.03, CAR008 399.48, CAR013 395.8. CAR026 is unplaced because 390 to 409.2 m has no sample.
C4, base of the last conglomerate above basement: CAR028 489.7, CAR026 482.7, CAR006 478.35, CAR005 468.7, CAR008 473.1, CAR013 461.

1. For CAR049, CAR046 and CAR002, pick C1 to C4 from section_lithology.csv using the same four definitions. Where the rock log does not reach a contact, use the top of the matching unit in sarig_section_strat.csv instead: C1 Corraberra Sandstone Member, C2 Tregolana Shale Member, C3 Whyalla Sandstone, C4 Donington Suite.
2. Make section_contacts.csv with one row per contact per hole: contact, hole, depth_m, rl, source (reviewed, rock log or stratigraphic log only), strat_log_top_m, difference_m, recommendation (accept or review) and reason.
3. Draw interpreted_contacts.png: the observed section with a line joining each contact between neighbouring holes. Use solid lines where both ends come from a reviewed pick or the rock log, and dashed lines where an end comes only from the stratigraphic log. Carry C3 across CAR026 as a dashed line. Label each line C1 to C4 at the right edge.
4. In your report, give the apparent dip of each contact along the section in degrees, the RL change of each contact between neighbouring holes, and say whether the logs support each of these: steady bedding, an unconformity at C4, and a fault. These are suggestions for a geologist to accept or reject, so do not state them as facts.

Save the table as CSV and the figures as PNG.
The agent’s picks for the three new holes, in metres:
| Contact | CAR049 | CAR046 | CAR002 |
|---|---|---|---|
| C1 | 95, stratigraphic log only | 94, stratigraphic log only | 88 |
| C2 | 123, stratigraphic log only | 121, stratigraphic log only | 126 |
| C3 | 426.4 | 427.1 | 394.53 |
| C4 | 483.6 | 476.2 | 472.65 |
Most picks hold up, but two need a closer look:
- C4 differs from the stratigraphic log in two holes. In CAR049 and CAR046, that log puts the top of the Donington Suite at the top of the basal conglomerate, at 475.65 m and 472.3 m. Our definition puts C4 at its base, as in the other seven holes.
- C3 is the problem. Both rock logs start inside siltstone, and the agent took the first sandstone below it as the base of the shale. That put C3 20 to 25 m lower than in the neighbouring holes, and the report then suggested a fault to explain the dip it had created.
Step 3: Review the Contacts
We kept 34 of the 36 picks. These are the other two:
| Pick | Agent’s suggestion | Our decision | Reason |
|---|---|---|---|
| C3, CAR046 | 427.1 m | 402.75 m | The first grit band below the fine siltstone, as below C3 in CAR028. Its RL of −314.71 m is level with CAR006. |
| C3, CAR049 | 426.4 m | Left unplaced | The rock log starts at 390 m inside siltstone, the same depth as the stratigraphic top, so the contact could be anywhere from 390 to 425 m. |
Send those decisions back and ask for the final contacts:
I reviewed section_contacts.csv as the geologist. Use these decisions and no others.

C1, C2 and C4: accept all nine picks.
C3: change CAR046 to 402.75 m, the first grit band below the fine siltstone. Mark CAR049 as unplaced, because its rock log starts at 390 m inside siltstone and its stratigraphic top is the same 390 m, so the contact could be anywhere from 390 to 425 m. Keep CAR026 unplaced. Accept the other six C3 picks.

Why: the earlier picks at 426.4 m in CAR049 and 427.1 m in CAR046 sit 20 to 25 m below this contact in the neighbouring holes, where siltstone also continues below C3.

1. Make final_section_contacts.csv with contact, hole, depth_m, rl and decision (accepted, changed or unplaced).
2. Make section_rl_changes.csv with the RL change of each contact between neighbouring holes in distance_m order, north minus south, and the distance between them. Compute it from final_section_contacts.csv and leave it blank where a contact is unplaced at either end. Report only values computed from this table.
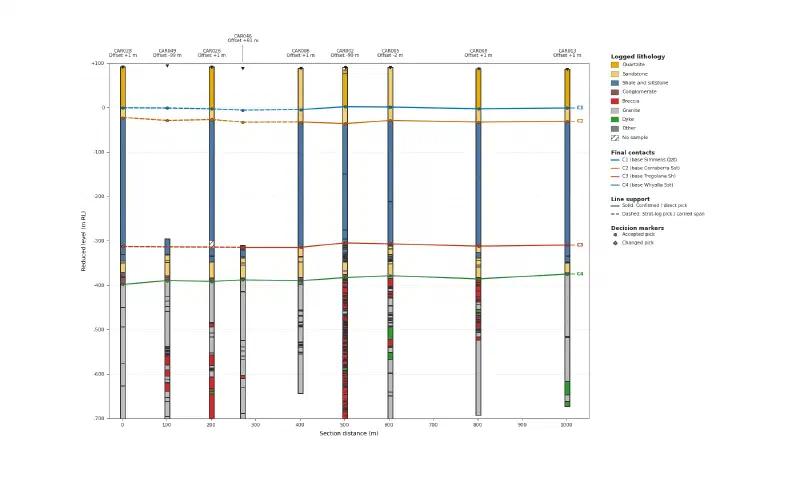
3. Draw section_contacts.png with the layout and colours of the observed section, plus a line for each final contact joining neighbouring holes. Use solid lines where both ends are reviewed or rock log picks, and dashed lines where an end is a stratigraphic-log-only pick. Carry C3 as one dashed line from CAR028 to CAR046 across CAR049 and CAR026. Label each line C1 to C4 at the right edge. No figure title.
4. In your report, say whether the corrected contacts support steady bedding, an unconformity at C4, and a fault. A fault should move every contact by about the same amount and leave a step. These are suggestions for a geologist to accept or reject.

Save the tables as CSV and the figure as PNG.
The final table has 33 accepted picks, 1 changed pick and 2 unplaced picks. We recomputed every RL and every change between holes from the source files, and they match.
Read the Contacts for Dip, Unconformities and Faults
These are the RL changes between neighbouring holes, in metres, north minus south:
| Holes | Distance (m) | C1 | C2 | C3 | C4 |
|---|---|---|---|---|---|
| CAR028 to CAR049 | 100 | −0.53 | −6.53 | n/a | +8.57 |
| CAR049 to CAR026 | 100 | −1.85 | +2.15 | n/a | −1.95 |
| CAR026 to CAR046 | 70 | −3.06 | −6.06 | n/a | +3.44 |
| CAR046 to CAR006 | 130 | +1.45 | +0.45 | 0.00 | −1.70 |
| CAR006 to CAR002 | 100 | +6.22 | −3.78 | +9.89 | +6.92 |
| CAR002 to CAR005 | 102 | −0.69 | +7.31 | −2.19 | +4.26 |
| CAR005 to CAR008 | 198 | −3.79 | −3.79 | −5.24 | −7.19 |
| CAR008 to CAR013 | 200 | +1.78 | +1.78 | +2.46 | +10.88 |
Three geological questions follow from the table:
- Layer dip: C1, C2 and C3 stay within 8 to 14 m of level along the whole kilometre, so the layers above the basement are close to flat.
- Unconformity: C4 sits at the base of a conglomerate in 8 of 9 holes, and it rises about 23 m from south to north. An uneven surface under a conglomerate fits an unconformity, an old erosion surface, but the logs alone cannot prove it.
- Fault: No pair of neighbouring holes shows all four contacts moving by about the same amount. For example, C3 rises 9.89 m from CAR006 to CAR002 while C2 drops 3.78 m.
Step 4: Draw Alternative Shapes for the Breccia
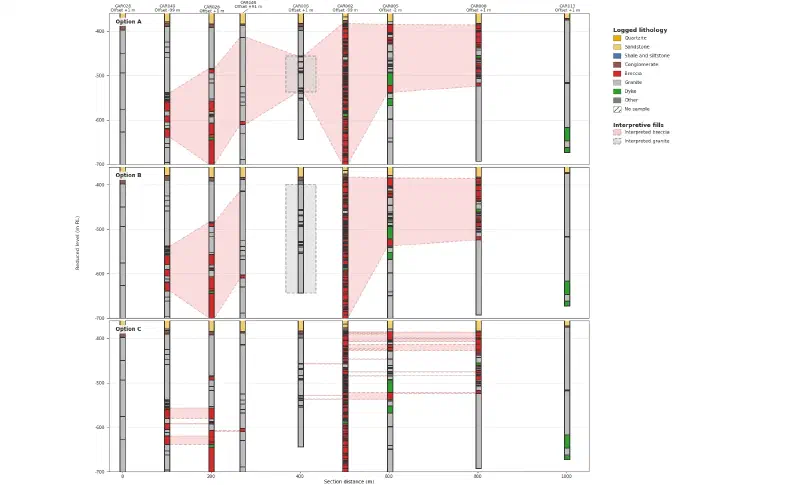
Below C4, the granite holds zones of breccia, broken rock cemented back together. This is where the holes leave most room for interpretation. The prompt asks the agent to tabulate the breccia and draw three rival shapes:
Next, interpret the breccia in the granite below C4. Use section_lithology.csv and final_section_contacts.csv.

1. Make breccia_intervals.csv: for each hole, the Breccia intervals below C4 down to RL -700 m, joining intervals less than 10 m apart, with hole, top_rl, base_rl and thickness_m. List holes with no breccia above -700 m too.
2. Draw breccia_options.png at exactly 1800 x 1092 pixels with three panels stacked, with space between them, each showing distance -30 m to 1,050 m and RL -360 m to -700 m at true scale, with the hole columns coloured by rock_class. In each panel draw one interpretation as filled shapes between holes:
- Option A, one body: a single breccia body from CAR049 to CAR008, with the thin breccia in CAR006 explained as a granite block inside it.
- Option B, two bodies: a southern body around CAR049 and CAR026 and a northern body around CAR002, CAR005 and CAR008, with granite between them at CAR006.
- Option C, lenses: separate breccia lenses, joined between neighbouring holes only where their RL ranges overlap.
Every shape must honour the logs: breccia wherever a hole logs breccia, and no breccia where a hole logs granite. End all bodies before CAR028 and CAR013, which log no breccia. Put each option name inside its panel, one distance axis under the bottom panel, RL ticks every 100 m, and every label and axis inside the frame.
Colours: Quartzite #E6AB02, Sandstone #F2CF6B, Shale and siltstone #4C78A8, Conglomerate #8C564B, Breccia #D62728, Granite #BDBDBD, Dyke #2CA02C, Other #7F7F7F, No sample white with grey hatching. Draw the interpreted shapes in a lighter red with a dashed outline, so they never look like logged rock. Hole names above the top panel only. No figure title.
3. In your report, list for each option which logged intervals it explains well and which it struggles with. These are interpretations for a geologist to compare, so do not choose one.

Save the table as CSV and the figure as PNG.
The breccia table matches our own calculation. Joining intervals less than 10 m apart means each total includes some short gaps:
| Hole (south to north) | Breccia above RL −700 m (m) |
|---|---|
| CAR028 | 0 |
| CAR049 | 75.25 |
| CAR026 | 138.32 |
| CAR046 | 8.3 |
| CAR006 | 10.2 |
| CAR002 | 317.06 |
| CAR005 | 68.6 |
| CAR008 | 99.4 |
| CAR013 | 0 |
Each option explains some logs better than others:
- Option A, one body: treats the thick breccia from CAR049 to CAR008 as one system. It needs a large granite block inside the zone at CAR006.
- Option B, two bodies: fits the granite at CAR006 directly. It leaves the two thin breccia intervals in CAR006 outside both bodies.
- Option C, lenses: joins only intervals that line up in elevation. It breaks the 317 m of breccia in CAR002 into thin bands with no geological reason.
Options A and B are zones that contain breccia, not solid breccia. Granite inside them stays granite in the hole columns.
Step 5: Test the Options With Check Holes
Now upload the two check hole files to the same project. These holes played no part in the options, so they can test them:
I uploaded sarig_check_holes_details.csv and sarig_check_holes_litho.csv: three check holes that were not used for the options. CAR025, CAR017 and CAR021 sit 89 to 99 m west of the section line, at almost the same northing as CAR026, CAR006 and CAR008.

1. Join them on DRILLHOLE_NO, use the same rock_class rules, and take C4 in each check hole as the base of the last conglomerate. Make check_breccia_intervals.csv with the same breccia rule as before: below C4, down to RL -700 m, joining intervals less than 10 m apart.
2. Make option_check.csv: for each option and each check hole, what the option predicts at that northing, what the check hole logs, and whether it agrees, partly agrees or disagrees. The check holes are off the section, so they test how far each shape continues to the west, not the section itself.

These are tests for a geologist, so do not choose an option. Save the tables as CSV.
The breccia totals match our own calculation:
| Check hole | Next to | Breccia (m) | Option A | Option B | Option C |
|---|---|---|---|---|---|
| CAR025 | CAR026 | 27.4 | Partly agrees | Partly agrees | Partly agrees |
| CAR017 | CAR006 | 151.9 | Agrees | Disagrees | Disagrees |
| CAR021 | CAR008 | 171.9 | Agrees | Agrees | Partly agrees |
CAR017 separates the options. It logs 151.9 m of breccia 90 m west of CAR006, where Option B places a granite barrier and Option C almost no breccia. In contrast, CAR025 logs only 27.4 m next to CAR026, so the southern part of the zone probably thins to the west.
Step 6: Draw the Completed Section
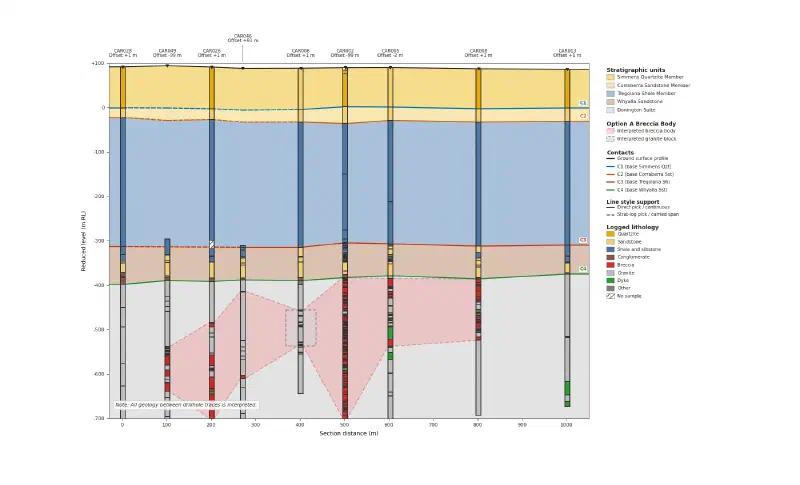
We chose Option A as the working interpretation. It is the only option that no check hole contradicts, but it is not proven. This prompt records that choice and draws the finished section:
I compared the options as the geologist. I choose Option A as the working interpretation, because CAR017, 90 m west of CAR006, logs 151.9 m of breccia where Options B and C predict little or none. CAR025 logs only 27.4 m, so the southern part of the zone probably thins to the west. Option A is not proven.

Draw fig_final_section.png at exactly 1800 x 1092 pixels and true scale, distance -30 m to 1,050 m, RL +100 m to -700 m. Fill the ground between holes with the named units bounded by the final contacts: Simmens Quartzite Member above C1 (#F6DC8B), Corraberra Sandstone Member (#F9E7B5), Tregolana Shale Member (#A9C1DC), Whyalla Sandstone (#D9C2B0) and Donington Suite below C4 (#E3E3E3). Draw a ground surface line through the collars. Draw the Option A breccia zone in #F4A3A3 with a dashed outline and the granite block at CAR006 with a dashed grey outline. Draw the contacts, with C3 dashed from CAR028 to CAR046 and C1 and C2 dashed where an end is a stratigraphic-log-only pick. Draw the hole columns on top, coloured by rock_class. Add a short note that everything between holes is interpretation. Label holes as name and offset rounded to the metre on two lines, with no labels touching. No figure title.

Save the figure as PNG.
The result has the observed holes on top of the interpreted ground. Every fill between holes comes from a decision in steps 3 and 6.
What the Drillhole Cross Section Shows
Read together, the six steps give a short geological story:
- Flat cover. The four layers above the basement are close to flat along the whole section.
- An uneven base. C4 has more relief than the contacts above and sits on a conglomerate in most holes, which fits an unconformity.
- No fault on this line. No pair of holes shows the shared step a fault would leave.
- A breccia zone in the granite. It is absent at both ends of the line, and the check holes favour one connected zone over two bodies or thin lenses.
Limits of a Cross Section From Drillhole Data
When you build a cross section from drillhole data, the result carries these limits:
- Interpretation, not observation. Only the hole columns are measured. Every fill and line between holes is a decision, and a geologist who knows the area should review them.
- One slice of a 3D body. The check holes sit off the line, so they show how far a shape continues west, not its exact form on the section.
- Projection distance. Three section holes sit up to 99 m off the line. That works here because the layers are close to flat, but steep geology would need a narrower swath.
- Open and log-only picks. C3 stays open in CAR026 and CAR049, and the upper contacts in CAR049 and CAR046 come from the stratigraphic log alone.
- Depth window. The section stops at RL −700 m, although several holes go deeper, and CAR006 ends at about RL −644 m.
- Joined breccia intervals. Breccia totals include gaps shorter than 10 m.
- Logs only. One company logged most of these holes, and no geochemistry or geophysics tests the picks independently.
- Yearly updates. The SARIG package changes each year, so a later download may not match the numbers here, which come from the package sourced on 9 November 2026.
- Check the written summary. Treat the saved tables and figures as the result, and verify historical drilling data against its source. We recomputed every depth, elevation and thickness in this guide from the source files.
FAQs
What is a geological cross section from drillhole data?
It is a vertical slice through the ground that shows logged rock in each drillhole at true depth, plus the interpreted layers and rock bodies between them. Geologists use it to understand structure, plan new holes and explain a deposit. Only the hole columns are measured; everything between holes is interpretation.
How do you project drillholes onto a section line?
Choose a line and a swath width, then move each hole inside the swath perpendicular to the line. A vertical hole keeps its shape, so only its position along the line changes. Inclined holes need their full path projected. Record each hole’s offset, because distant holes may not match the geology on the line itself.
Why can the same drillholes fit different cross sections?
Drillholes sample the ground only along narrow lines, often hundreds of metres apart. Between them, a rock body can be continuous, split in two or broken into lenses, and each shape can match every logged interval. Extra holes, geophysics and geological rules narrow the options, but rarely leave only one.
What is an unconformity on a cross section?
An unconformity is an old erosion surface where younger rocks sit on older ones, often with a time gap of millions of years. On a section it shows as a contact with more relief than the layers above, frequently with conglomerate on top. In this guide, contact C4, where conglomerate and sandstone rest on granite, fits that pattern.
How far from the section line can a drillhole be?
It depends on how fast the geology changes sideways. With flat layers, holes 100 m away can still show the right depths. With steep or folded rocks, even 25 m can mislead. Note each hole’s offset on the section and narrow the swath when nearby holes disagree.
Can an AI agent draw a geological cross section on its own?
An agent can project holes, tabulate logs, pick contacts and draw several interpretations quickly. In this guide it also placed two contacts too deep and then suggested a fault that the corrected picks did not support. Use it to prepare options and checks, and keep the final interpretation with a geologist.
Build Cross Sections in Geocluster
Open the Geocluster web workspace to build a cross section from drillhole data in your browser, without writing code or setting up servers. Create a project, upload your section files (or your own logs), and send the six prompts above. You get an observed section, reviewed contacts, rival shapes to test and a completed section built from your decisions.